ComfyUI
What is ComfyUI?
ComfyUI is a tool for using generative AI in a more customisable form that most other providers like DrawThings AI or Automatic1111. It utilises workflows laid out like a flow diagram that allows you to change what gets loaded and where it goes next. It means that unlike any other application that I have tried it allows you to generate something with one model and then use that generated image to go straight into another model, for example:
- generate an image using the Pony model and then use the output of that to go into an ultra realistic model to convert Pony’s cartoon style image into a realistic one.
- generate an image and the pass the image into another node to generate a light mask which can then be used with a model to add more detailed lighting to the final image.
- etc…
ComfyUI can be very daunting on first look, and it took me much longer than the other tools mentioned above to get to grips with the basics but once I understood those I was able to generate complex workflows fairly rapidly with great results.
MetaData and Node Manager
One of the great things in ComfyUI is that the workflows are saved as JSON and with a node you will see in many of my workflows this JSON can be embedded into the final output image/video/audio. This means that when you see media generated by ComfyUI online on a site like CivitAI you can often download that image and drag it into the workflow editor, and it will load the exact workflow with all the parameter that was used to create that image. You will still need to make sure you have the same nodes installed and the same models downloaded. To install the missing nodes there is a plugin called ComfyUI-Manager. This has a tool that lets you install all the missing nodes with the click of a button. This will only install nodes in their whitelist as custom nodes are running python on your machine with whatever privileges the account used to start the application has.
There was a security issue earlier in the year (2024) where a bad actor provided a custom node that downloaded some encrypted code from pastebin that would steal credentials from the host machines web browsers. The community quickly spotted it and the GitHub page for the node was swiftly shut down as was the users discord server, but it still shows how bad this can be as a potential attack vector. Using this manager to install nodes is not a complete protection from all threats and ideally the software should be run from a sandbox environment like a docker container (sadly tricky for AMD GPU users).
Basic Nodes
ComfyUI comes with an impressive amount of nodes out of the box and allows more to be installed (see more on that later, especially the warning). It also comes with some basic workflows like this one:
From start to finish:
- Load Checkpoint: this will load the model from the
models/checkpointsdirectory (clicking on the value produces a drop-down box of every model in the folder). - 2 * Clip Text Encode (Prompt): These are the positive and negative prompts.
- Empty Latent Image: This generates an empty image of the dimensions provided to use for the model to ‘paint’ into.
- KSampler: Here you specify the generation parameters like the seed, steps, cfg scale, sampler, scheduler, etc…
- VAE Decode: Converts the output data from the sampler into an image.
- Save Image: Does what it says on the tin.
This is a very basic workflow that will actually work with a lot of the more basic models. This one is I believe created for use with the Stable-Diffusion v1.5 model but will also work with things like Counterfeit or Pony and the later Stable Diffusion models (with some tweaking of the image size parameter for the XL versions). As you can see from the diagram the nodes are always input on the left and output on the right and the nodes get colour coordinated to make it easier to see what is going where, this is especially useful on the larger and more complex workflows.
txt2img
First Stable Diffusion Image
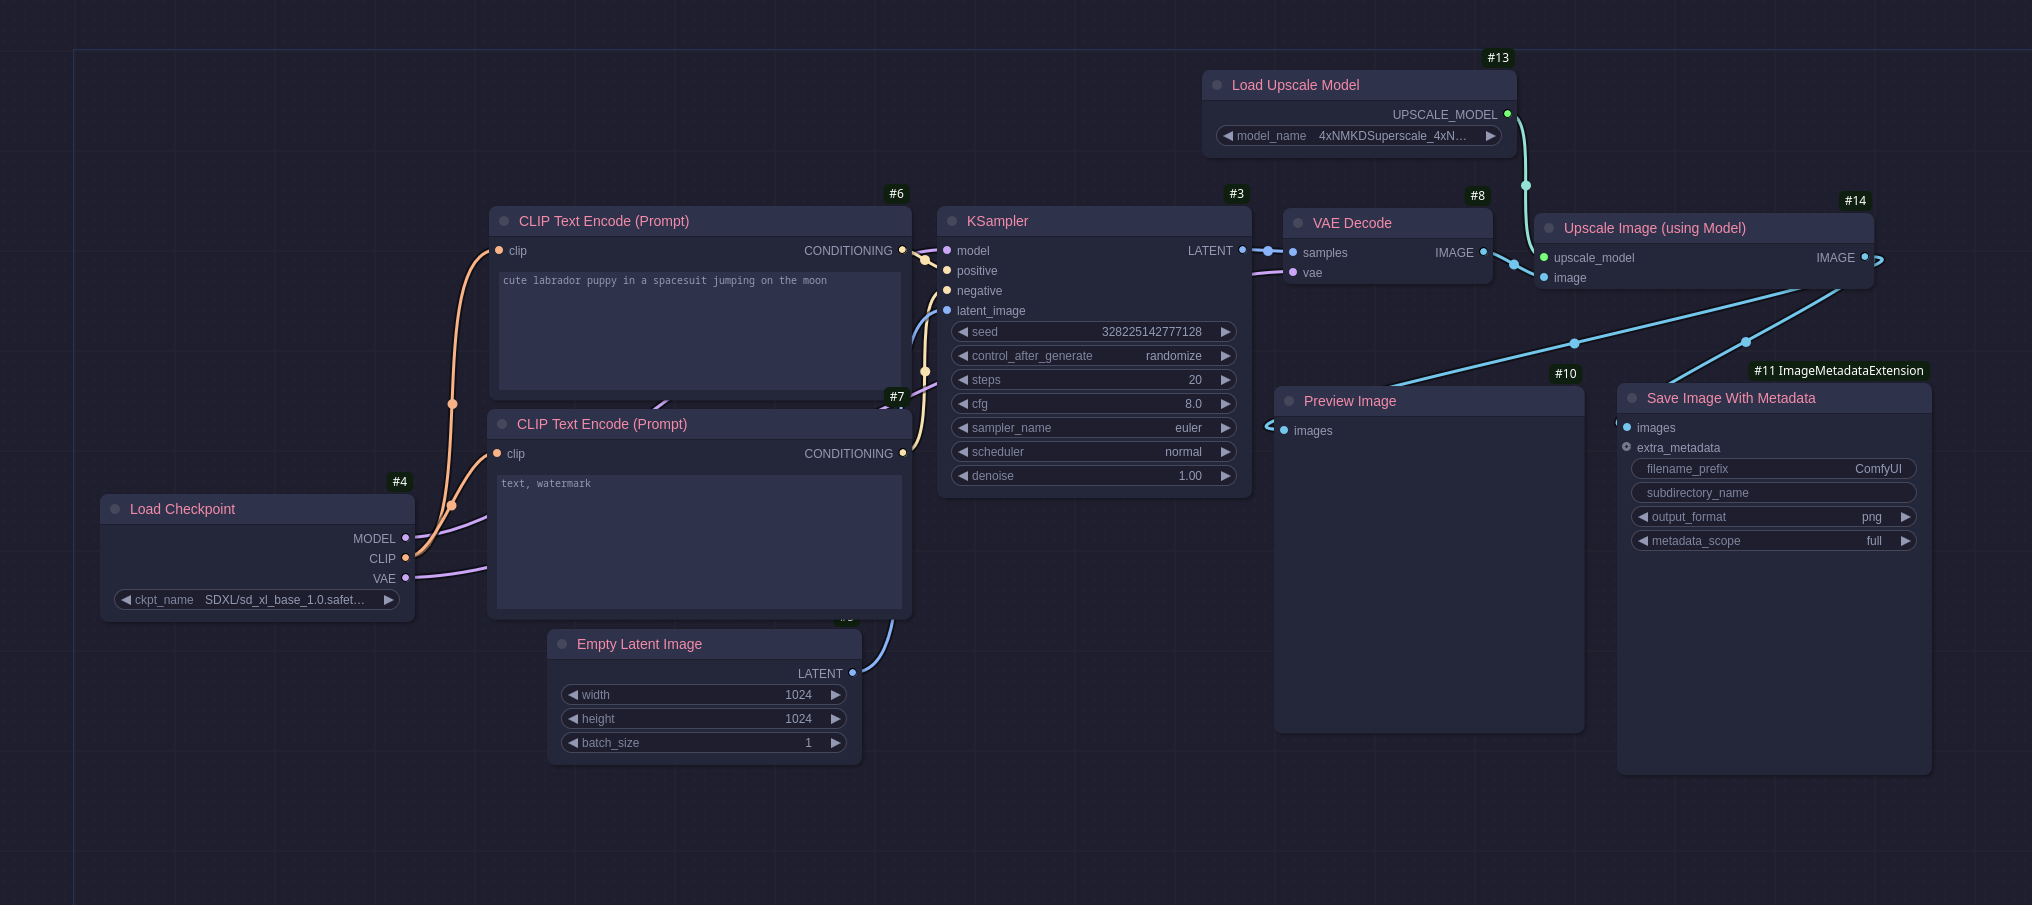
Stable-Diffusion is one of the most popular models in use and there are many other models based off of it, like Pony. This workflow uses the Stable-Diffusion XL model which is geared around making larger images from the start (1024*1024). You may notice that it is the same workflow shown in the previous section just with a different prompt and model. The workflow above produced the following image:
I won’t go into more detail on this workflow as everything relevant was mentioned above.
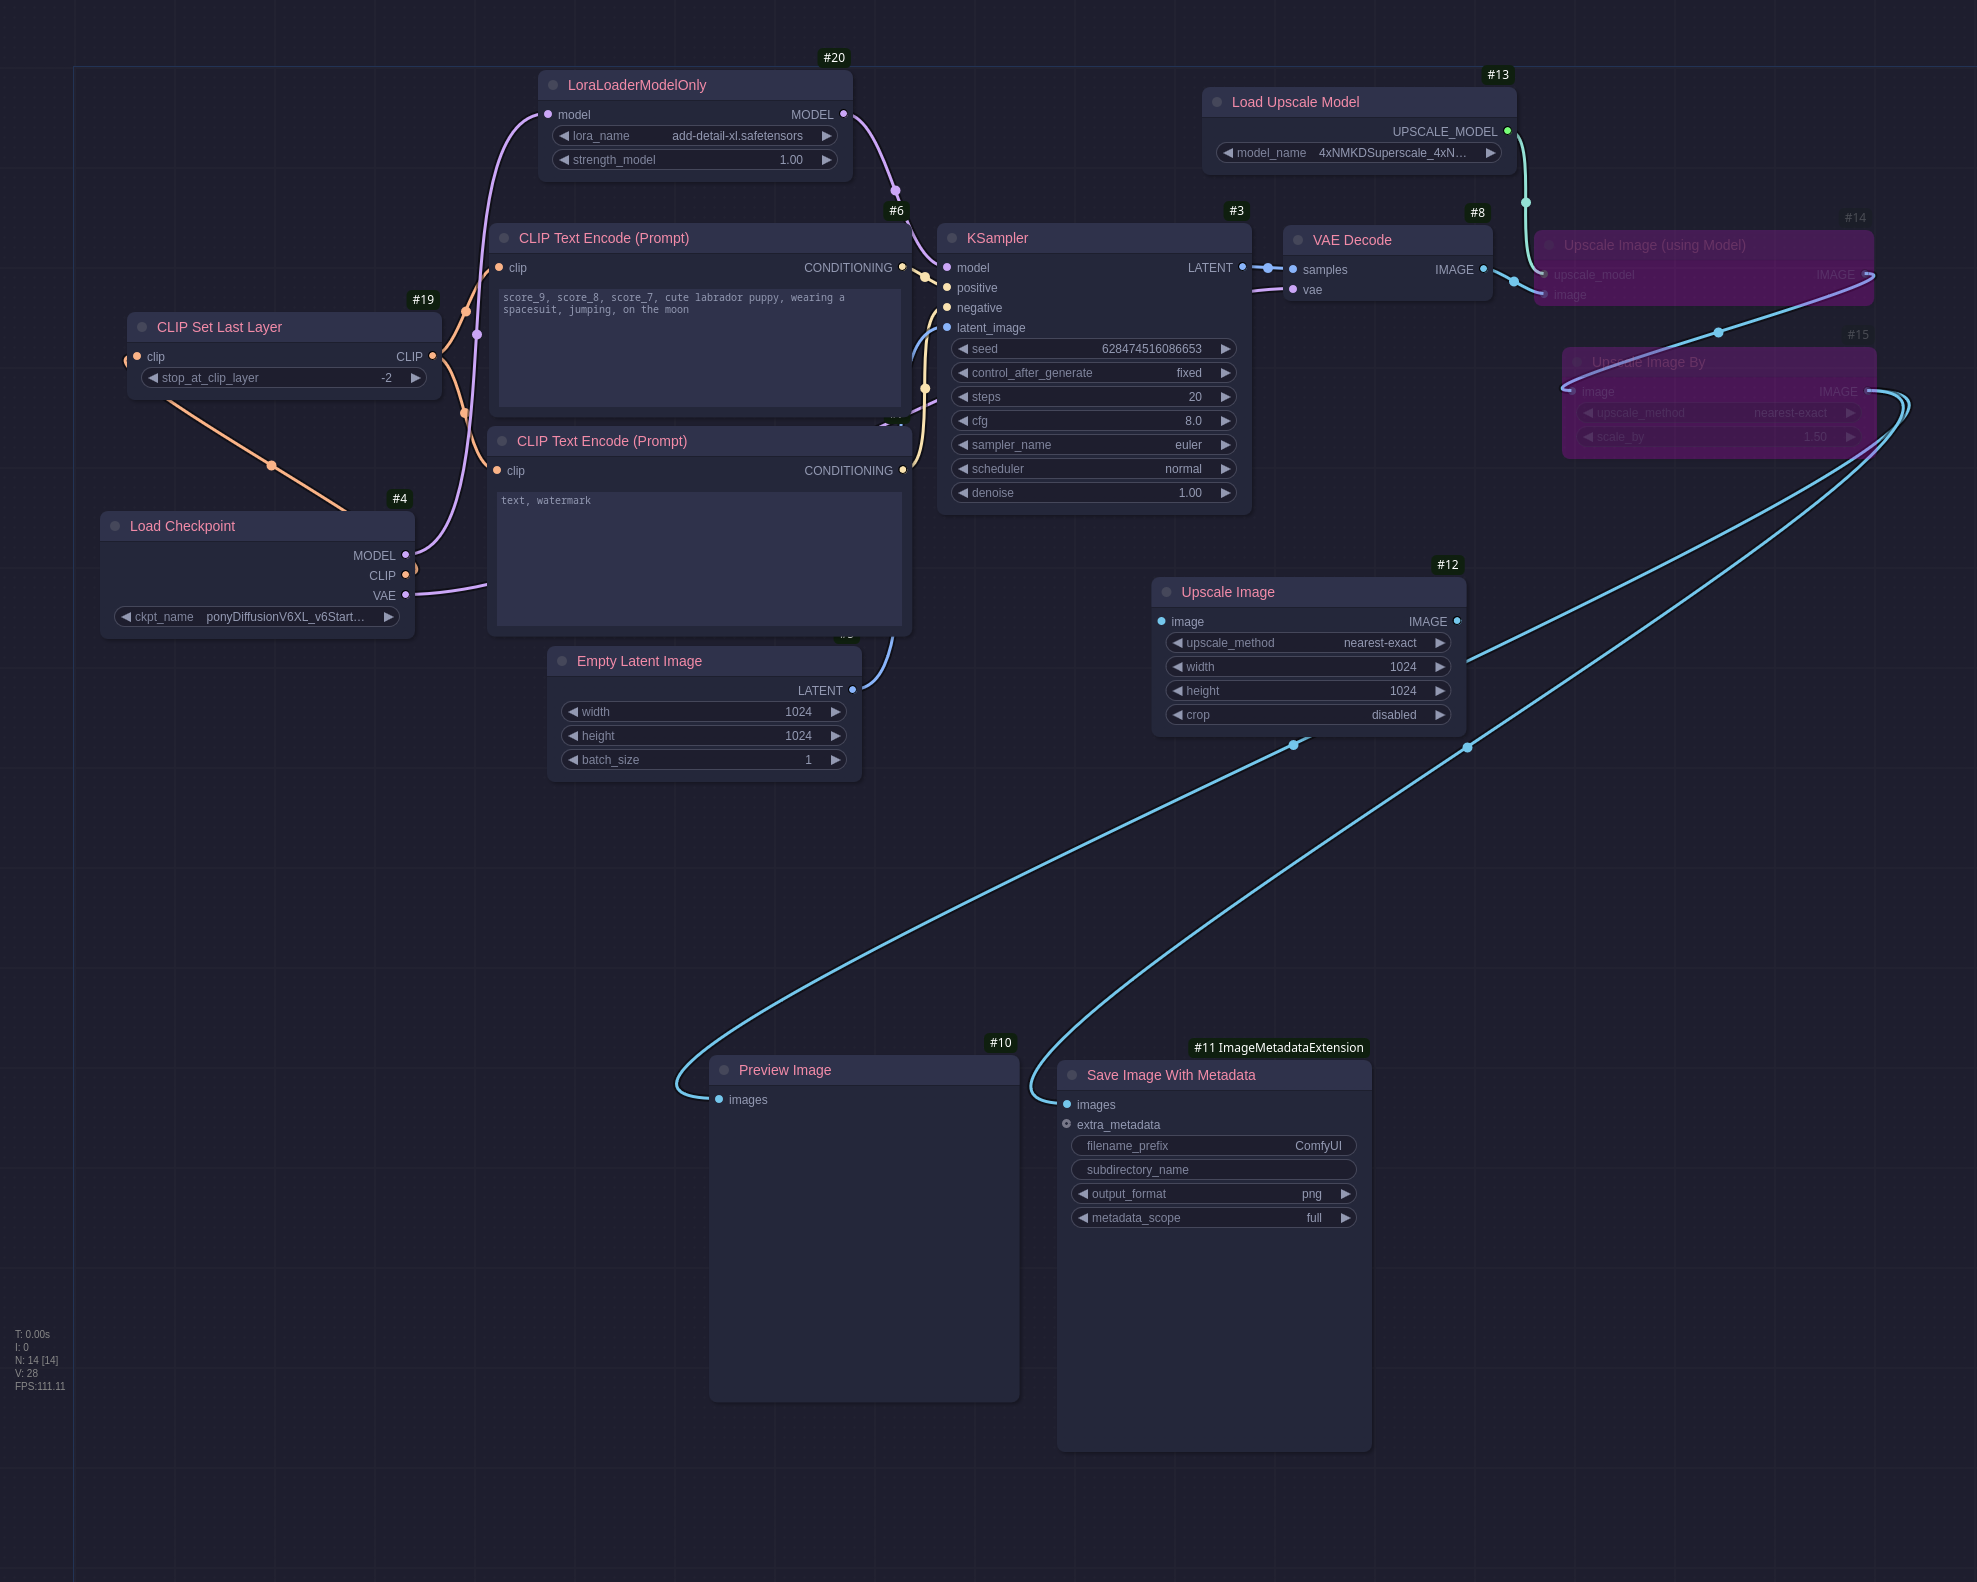
Pony
Pony is a somewhat risky model to use. It is one that has no NSFW filtering so sometimes when generating an image there may be explicit content out of nowhere. That being said, it is very good for generating cartoon images and has a lot of loras available that people have made. The model is based off of one of the Stable-Diffusion ones so it has a nice simple workflow in ComfyUI
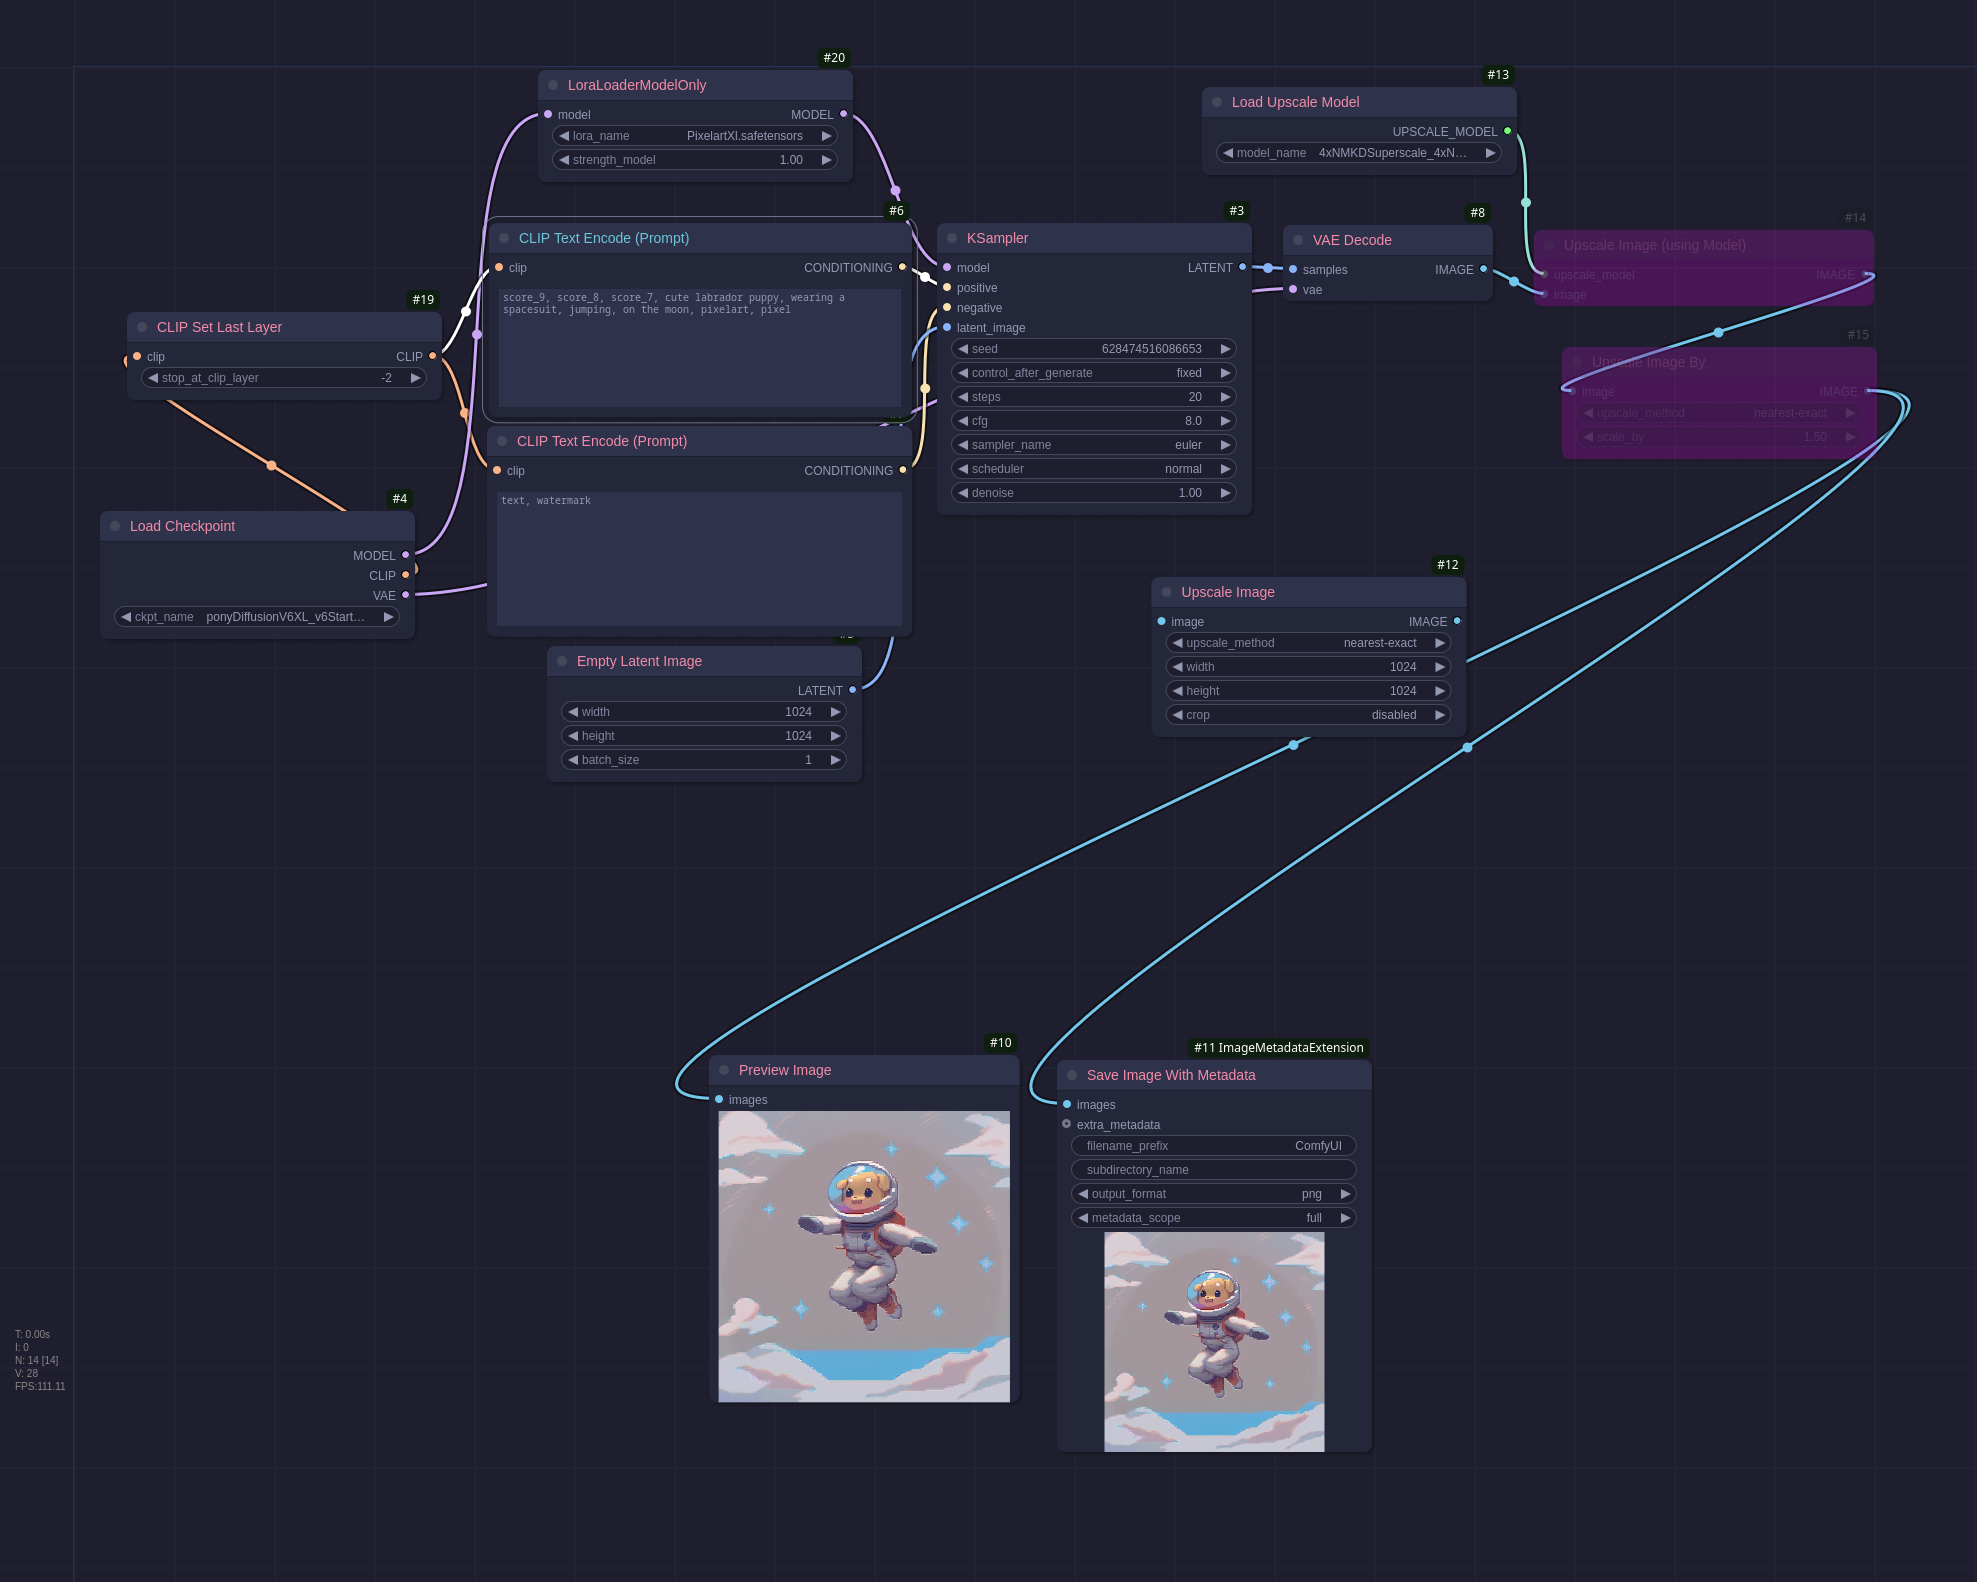
There are some new nodes here:
- CLIP Set Last Layer: I’ll be honest I dont really understand this but some models require clip skip to be set to 2 and this is how you do it in ComfyUI.
- LoraLoaderModelOnly: This will be covered in the Lora section.
- Load Upscale Model: This will be covered in the Upscaler section.
- Upscale Image (using model): This will be covered in the Upscaler section.
- Upscale Image By: This was superfluous and left in by mistake.
- Upscale Image: This was superfluous and left in by mistake.
- Preview Image: This displays a preview of the generated image, useful to not have to go digging through the output folder to see if the workflow produced the intended results.
- Save Image With Metadata: This is what embeds the metadata into the saved image, the properties are fairly self-explanatory.
You will notice that the prompt has score_9, score_8, score_7, at the start of it, this is a Pony quirk and the images generate much better with it included, there is a similar one for the negative prompt, but I forgot to add it this time. This workflow generated this image:
Flux
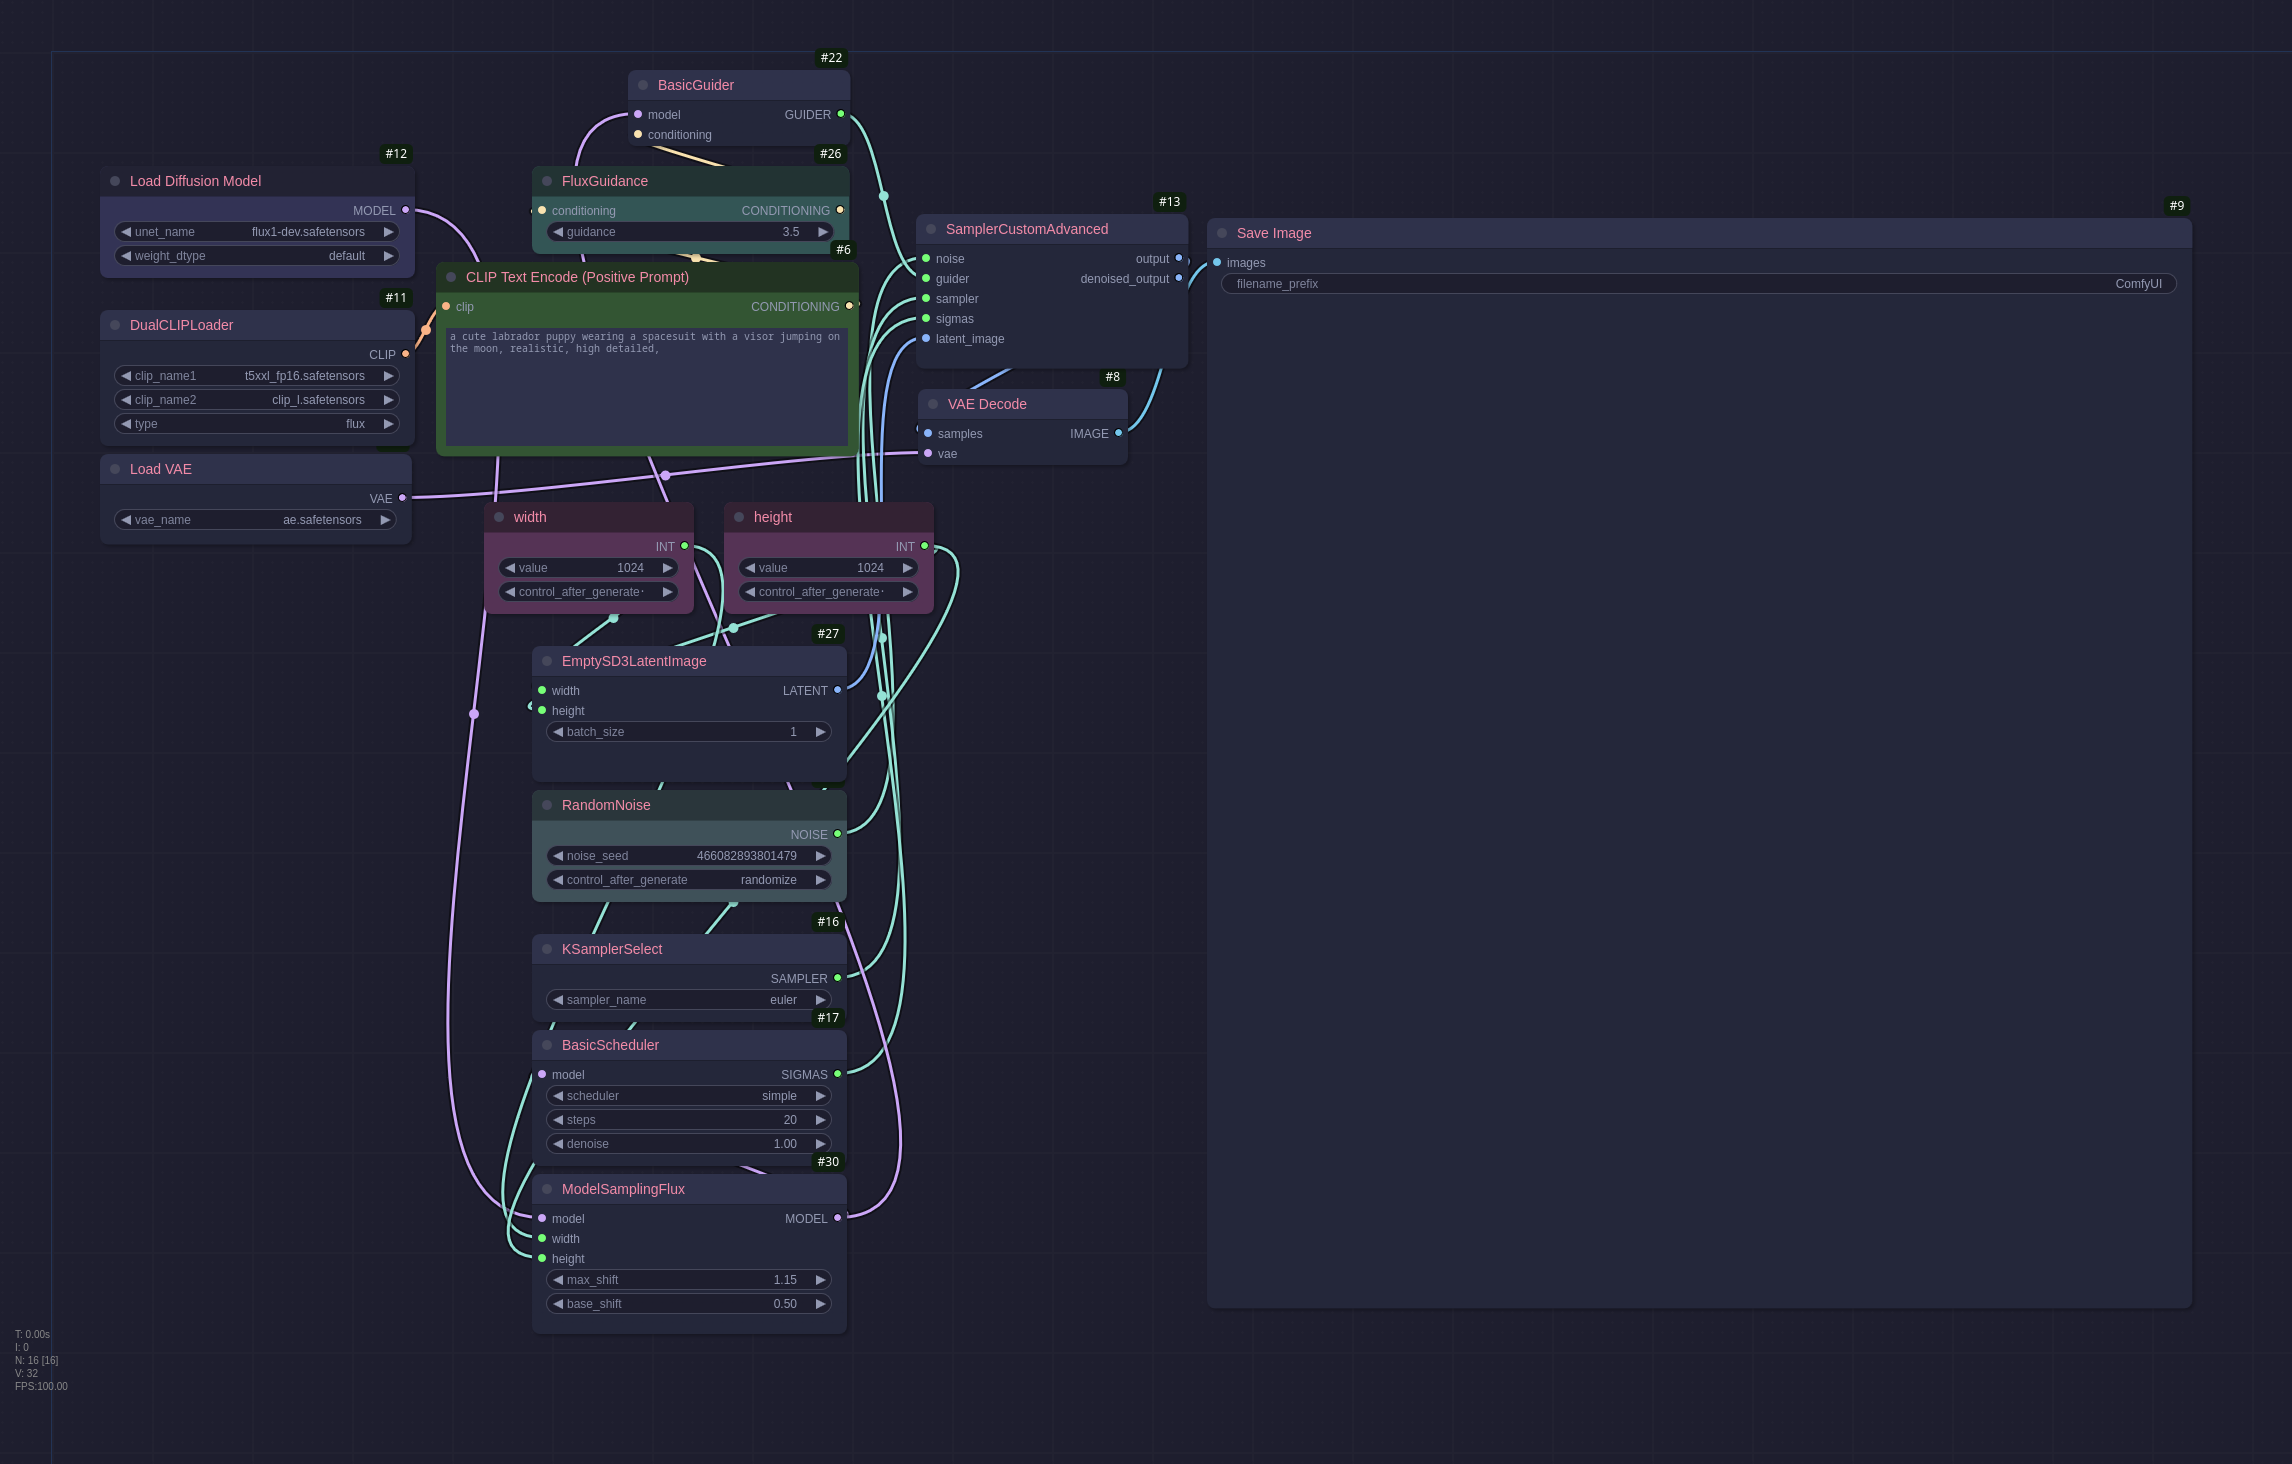
The Flux models are (as of writing) still quite new, they produce excellent results but are very resource heavy meaning you will struggle to run them without a very powerful GPU. Here is a Flux workflow:
There are a lot of new nodes in this workflow but as I don’t use Flux very often I haven’t explored them myself yet. The prompt has also changed, the older models like the SD and Pony ones require comma separated entries but with Flux and later AuraFlow they take a more detailed textual description. The workflow above generated this image:
Auraflow / Aurum
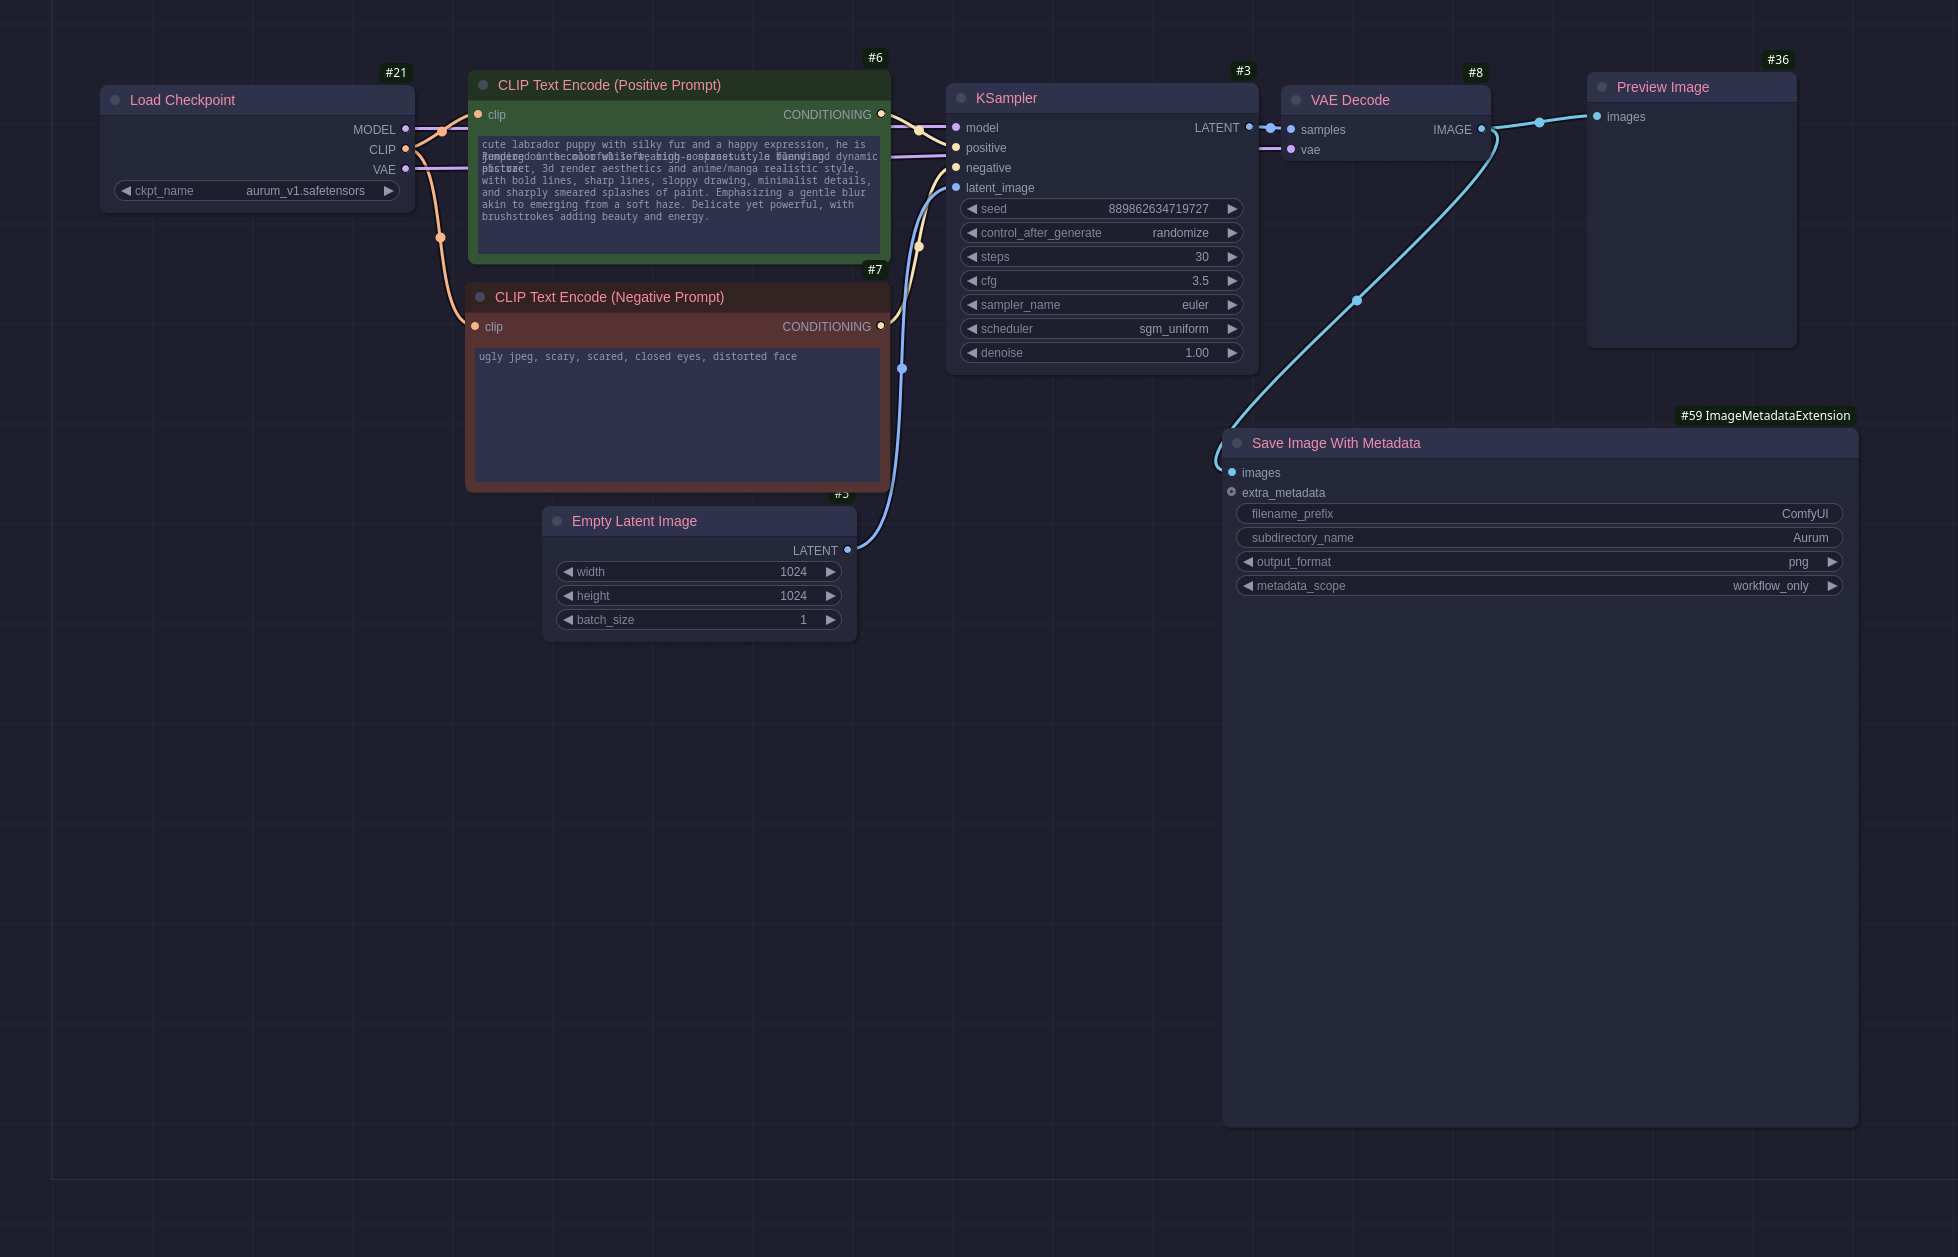
Auraflow is another new model like Flux, it is very detailed and also takes a detailed textual prompt. I personally prefer the Aurum checkpoint as I find it easier to get better results but your mileage may vary. Here is an Aurum workflow:
You can see the prompt is very descriptive (even if the text of some of it is blurred for some reason). This workflow also uses only the same basic nodes as the first workflow I have shown above so it is nice and simple to use. This gave me a great image that had much more whimsy which you can see here:
I love this model for how much you can put into the prompt without getting into a bracket hell I normally only ever encounter when working on old legacy code. I have been using this model to generate pictures for my D&D characters, some of which I will add to my gallery when I am happy with them. This model is also very good for adding text to an image, something the older models tended to spectacularly fail at.
txt2video
LTXVideo
Txt2Video is understandably very expensive computationally so when LTXVideo came along requiring much less resources to run I was very glad as the previous one I tried (Mochi) I could run it once then It failed every time thereafter until I rebooted my machine because it used that much memory. Like Flux and Auraflow it takes a very detailed prompt that describes the video in detail, in my example workflow for this post the video was not very good because my description was not long enough.
Even with its much improved efficiency I was only able to generate a short video in a reasonable timeframe when trying LTXVid: 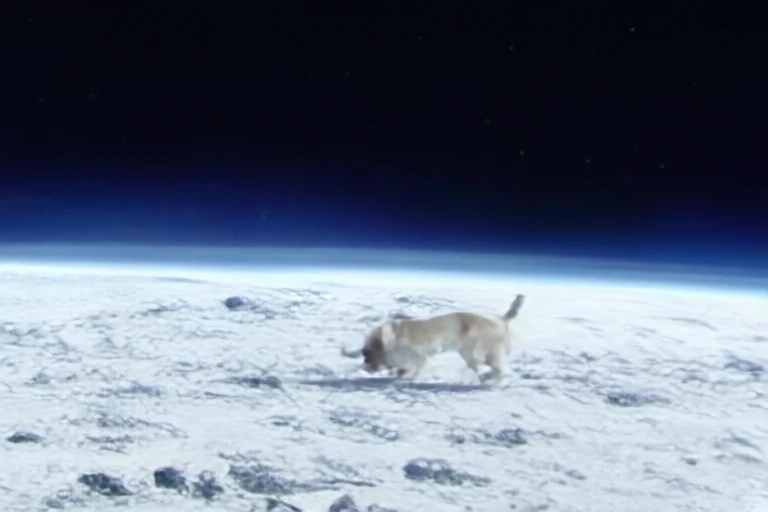
txt2audio
Stable Audio
Stable audio is an interesting model that seems to be a catch-all sound generation checkpoint. Here is a simple workflow generating some cello music: 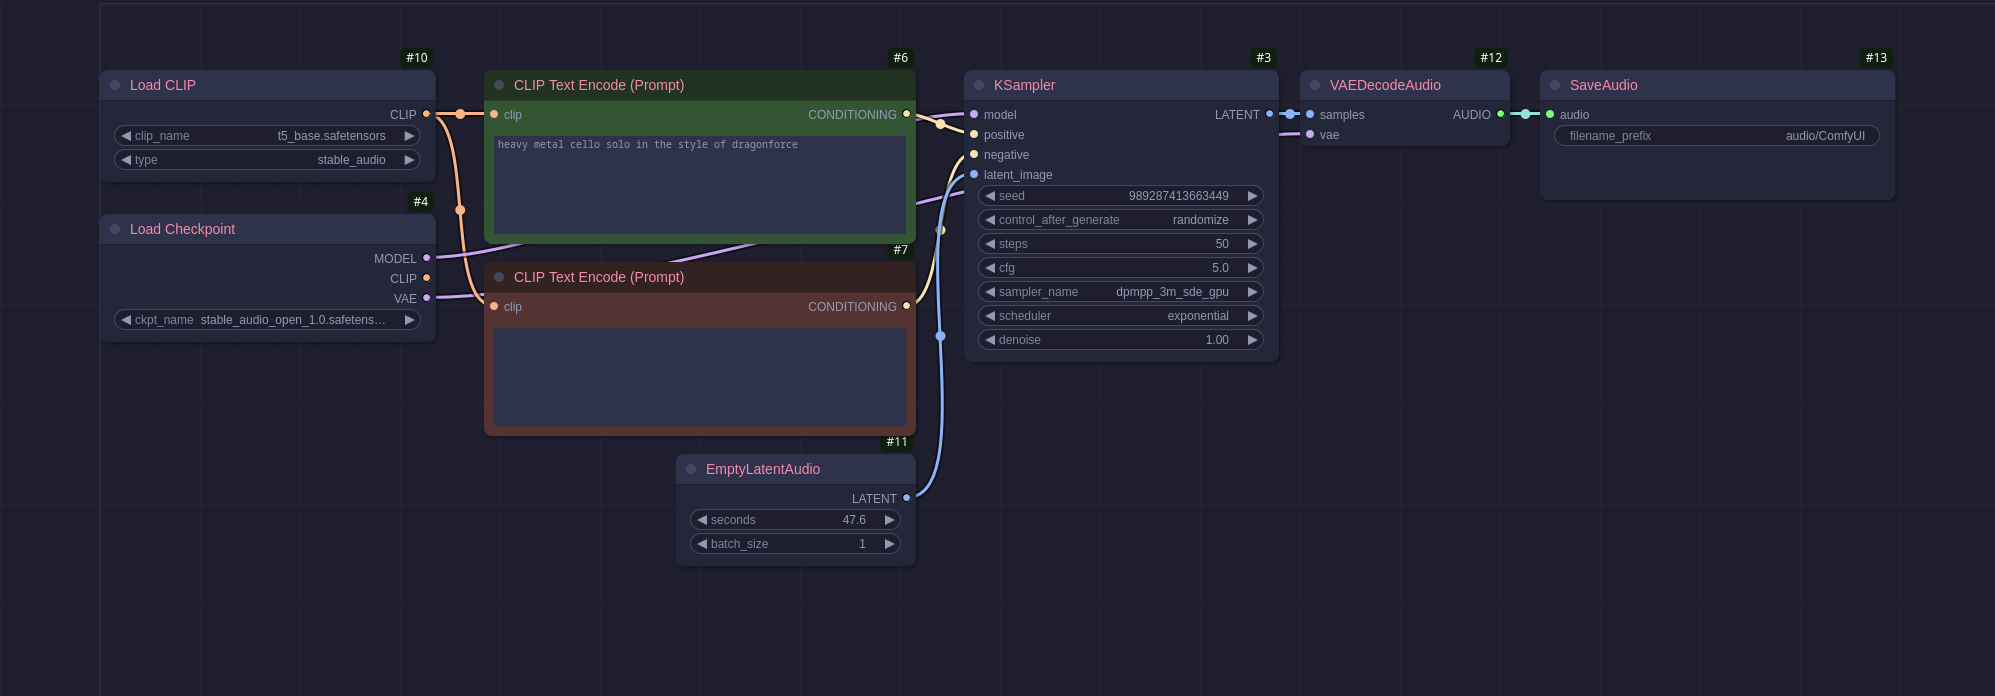
The workflow produced the following audio (sound warning, it is loud!): Metal Cello file
As you can tell its mostly noise and doesn’t sound very good. Audio generation is not something that I have played around with yet, I will be looking into it more in the future to see if I can use it to augment my cello recordings.
Universal Tools
Upscaling
Upscaling is a process to take an image as an input and return it at a larger size without a loss of quality, or in the case of some upscaler add in more clarity or other effects.
The workflow above adds two new nodes:
- Load Upscale Model: this loads a model from the
models/upscale_modelsdirectory much like the checkpoint loader. - Upscale Image (Using Model): this runs the image through the upscale process using the model provided with some default settings, in this case the model quadruples the size of the image.
I have opted not to display an upscaled image as I have no desire to have a 25mb image loading on my blog but the result was the same image just 26.7mb at 4096px*4096px.
Loras
Loras, to use a simple and probably incorrect analogy are mini patches for the model, they allow you to add a very specifically trained patch to the model which focuses on one aspect. Multiple loras can be added to a single workflow whenever a model is used. In this example the lora is focused on generating pixel art:
This workflow adds one of the lora nodes:
- LoraLoaderModelOnly: Loads the lora model, this like the other model loaders will allow you to select from any of the models in
models/loras.
In the lora loader node you can see a strength parameter, this is used to specify how much weight to assign to the lora, this is usually set between 0-1 but can be set higher on some loras. The prompt has also been adjusted to include pixelart, pixels, some loras need specific keywords to trigger properly, these are normally documented on the model page on CivitAi or HuggingFace. The workflow generates this picture:
Final Thoughts
I really like ComfyUI, it is very versatile and quite easy to use when you get the basics down. The unfortunate security issues mentioned above can be ameliorated by not using random nodes you find online and only using the whitelisted ones, or better yet run it in a docker container (if only I could get that to work with my AMD card). I am looking forward to doing more research and play with this in the future, seeing that some people have live running workflows based on video input makes me think there will be interesting avenues to do the same with audio, maybe generating imaged based on a sound clip recorded, there are lots of ideas percolating in my head for the future.
